To import your custom information via CSV, you first have to open the Archilogic floor plan to which you want to map your data in the Archilogic Editor.
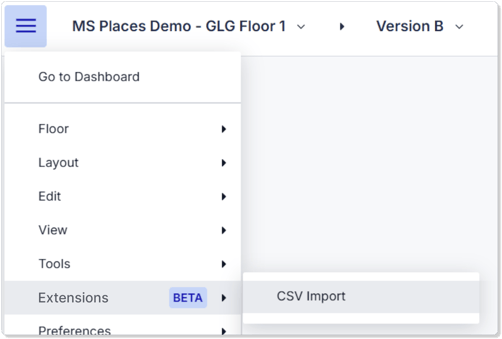
Then open the main menu and go to Extensions and select the CSV Import extension.
The CSV Import extension will now be shown on the left side of the window.
You can either drop a CSV file into the grey box or left-click the link within the box to open a menu to select a CSV file from your computer.

After importing the CSV, the extension will show you a preview of the available information.
Click the blue Mapping button to continue.
If you realize that you imported the wrong CSV file, you can click the X button next to the file name to remove the CSV again and select a different file instead, as shown above.

You now have to select the target resource type to which you wish to map your information.
You can choose between Asset and Space in the dropdown menu.
Selecting Asset will allow you to map data to assets such as component instances or individual assets, such as chairs, tables, or sensors, etc.
Selecting Space will allow you to map data to individual spaces, such as offices or meeting rooms, etc.

You now have to specify which data you wish to map to which custom attribute.
- Select a column from your CSV. In our example below, the column is called Id.
- Select an existing custom attribute to which you wish to map the data to.
In our example, the custom attribute field is called Employee ID.
If the required custom attribute field does not yet exist, you can click here to learn how to create a custom attribute field.
You can now either add an additional mapping by left-clicking the + Add Mapping button and connect a different column from your CSV file to a different custom attribute field, or you can click the blue Assignment button at the bottom to continue.

You're now in the mapping stage of the extension.
You can now map a datapoint from the selected CSV row to the previously selected custom attribute field of an asset.
- Left-click the target button next to the row.
- Then left-click a target asset.

If done correctly, you will see a blue check mark showing up next to the row. The mapped asset will also be highlighted in red.

If you select the highlighted asset you can also see that the value from the CSV file has been added to the custom attribute field.

You have successfully mapped a datapoint to an asset. You can now repeat this action to map the remaining entries from your column to other assets.
If you want to see to which asset you mapped a datapoint, you can simply left-click the magnification glass button next to the row, and the corresponding asset will be highlighted.
If you wish to remove a connection between a datapoint and an asset, you can left-click the X button next to a row.
You can also click the blue arrow button in the lower left corner of the extension to go back and add additional connections.
Note that the imported CSV will NOT be saved in the editor. If you close the CSV Import extension and re-open it later, you will have to re-import the CSV file into the extension.
However, already mapped datapoints will remain and show up as assigned the next time you import the same CSV file.