1. Requirements
General Requirements
Ensure that the following requirements are met before you start:
- Your Archilogic account already exists.
- Archilogic has converted your floor plan into a Microsoft Places and IMDF-ready data model
- Your buildings, floors, sections, rooms, desk pools, and desks are already set up in Microsoft Places.
Microsoft Graph API requirements
- If you wish to use the Microsoft Graph API to push and pull data from and to Microsoft Places, you have to make sure that the Microsoft Places Integration is enabled in your Archilogic account.
Manual data exchange requirements
- If you wish to manually export your CSV files from Microsoft Places and manually upload your IMDF files to Microsoft Places instead of using the API, make sure to have the latest version of Microsoft PowerShell installed on your computer.
This article makes use of some PowerShell commands for Microsoft Places. You can find additional information and PowerShell commands in the full Microsoft Places documentation.
2. Export Microsoft Exchange Data Dump
If you're using the Microsoft Places Integration for Archilogic, you can skip this step and jump ahead to Part 3.
To start the mapping process, you first need to export a Microsoft Exchange Data Dump containing the Microsoft Place IDs of the building’s floor that you want to map to the corresponding Archilogic floor plan model.
To do that, you need to:
- Open PowerShell
- If you haven’t accessed Microsoft Places through the PowerShell before, make sure to first install the necessary Microsoft Places Module by using this command (otherwise, you can skip this step):
Install-Module -Name MicrosoftPlaces -AllowPrerelease -Force
- Connect to Microsoft Places by using the following command:
Connect-MicrosoftPlaces
A login pop-up will open, allowing you to sign into Microsoft Places using your existing Microsoft login credentials. - Use the following command to list your buildings. From the result, pick the PlaceId of the one that you plan to map to the Archilogic floor plan model:
Get-PlaceV3 -Type Building | Select DisplayName, PlaceId, Type
-
Export a Microsoft Exchange Data Dump of the correct building by adjusting and using the following command:
Get-PlaceV3 -AncestorId XXXXXXXX-XXXX-XXXX-XXXX-XXXXXXXXXXXX | export-csv "C:\...\XX.csv" -NoTypeInformation
- Replace
XXXXXXXX-XXXX-XXXX-XXXX-XXXXXXXXXXXXwith the correct PlaceId of the building you wish to export (See step 3). You can learn more about setting up buildings and floors on this Microsoft page. - Specify the exact export folder here:
"C:\\...\\XX.csv"
- Keep the quotes in the command.
- The folder structure needs to exist before you run the command.
- Choose a name for the file to be exported.
- Make sure that the file ends with CSV. - By running this command the Data Dump of your Microsoft Places building will be exported to your specified folder.
The complete command should look something like this:

- Replace
3. Import Microsoft Exchange Data into the Archilogic Editor
- Sign in to your Archilogic Dashboard: https://app.archilogic.com/login
- Find the correct floor to which you wish to map Microsoft PlaceIDs
- Right-click the floor and open it in the Archilogic Editor

- If the building you're setting up has more than one floor, you have to connect your Archilogic floor plan to a building entity. Learn how to connect your Archilogic floor plan to a building.
NOTE: You must repeat this step for each floor of the same building! - Microsoft Places requires a floor plan to be geo-referenced before it can be imported. You can geo-reference your Archilogic floor plan model by following this guide.
NOTE: If you connected your floor plan to a building, you only have to do the geo-referencing once (for the building) and not for each individual floor. We recommend geo-referencing the lowest floor of your building, for example, the ground floor. - Then open the main menu in the top left corner and select Extensions > MS Places.

- The MS Places Import extension will open on the left side of the window.
The first time you run the Microsoft Places extension it will automatically create a couple of custom attribute called: MS Places Directory Id and MS Places Section Id . You may see 2 notifications about this popping up in the lower right corner of the window.
These newly created custom attributes will receive the Microsoft Places IDs once we continue with the mapping process.
You now have to select the Data Source which can either be CSV Import, or the Microsoft Places API (recommended).
Please note that in order to use the Microsoft Places API as a data source the Microsoft Places Integration has to be enabled for Archilogic.
- (If you selected Microsoft Places API, you can skip this step.)
If you selected the CSV Import Data Source, you can now either drag and drop the previously exported CSV into the grey field or left-click the blue link to open the file browser and select the correct file on your computer.
- After importing the CSV, or selecting Microsoft Places API as data source, open the first drop-down menu and select the correct building.
NOTE: This is not the same building object that you just created in step 4. This is the building you created in Microsoft Places! It should refer to the 'same' building, but can have a different name depending on how you named it in Microsoft Places.
- Select the correct floor in the second drop-down menu. Ensure that the floor you’re selecting is the same one as the Archilogic floor plan that is currently open in the editor.
Then left-click the Apply button.
- After applying the correct building and floor, the extension will show all the IDs for the rooms, desk pools, and desks you created in Microsoft Places earlier.
The Filter by section drop-down menu allows you to filter between different sections or to show all IDs regardless of which section they belong to.
You can now move forward with automatically assigning the Places IDs.

4A. Automatic ID assignment
For the automatic ID assignment to work, the floor plan you sent to Archilogic must already contain IDs that match the IDs you set up as resources in Microsoft Places!
- Archilogic now supports automatic ID assignment. The feature attempts to automatically match your Microsoft Places IDs with the Custom IDs of all the spaces and component instances in your Archilogic floor plan.
- To start, left-click the Auto-assign button

- You can now see a list of Microsoft Places IDs for which a match was found on the Archilogic floor plan.
Adjust the threshold to determine how high the matching percentage of an ID should be for it to be included in the automatic ID assignment.
You can see the matching percentage below each ID in the list.
- To exclude an ID from being automatically assigned, you can simply untick the checkbox next to it. You will be able to assign it to a resource manually later on.
- You can move the mouse cursor over an ID in the list to see the corresponding resource on the Archilogic floor plan.

- Once you're happy with the selection of IDs you want to automatically assign, scroll to the bottom of the list and click the Assign selected button.

- If you still have unassigned IDs left after this step, you can continue with the manual ID assignment instructions.
4B. Manual ID assignment
- Enable asset labels in the Editor to make it easier to find the correct assets to which you want to assign a Microsoft Places ID.
- To assign the Microsoft Places IDs to spaces or components on the Archilogic floor plan, you have to first left-click the button with the target icon in the list and then left-click the corresponding space or the corresponding workstation component on the Archilogic floor plan.
If you want to correlate an ID with a room or space, make sure to left-click the empty floor of said room or space.
If you want to correlate an ID with a desk, make sure to left-click the workstation component
You can only correlate desk IDs to workstation components and not individual desk assets!
Click here to learn how to create components.
- Successfully mapped spaces and desks will be highlighted in a light blue or purple color on the floor plan. In addition, you can also see a checkmark next to the room name in the list.
If you made a mistake and want to remove the connection between the ID and the selected resource on the floor plan, simply click the button with the X icon to remove it.
If you wish to look for the connected resource of a specific ID, left-click the button with the looking glass icon, and the connected room, space, or workstation components get highlighted in a slightly darker color.
If you select a room, space, or workstation component with a left-click, you will also see that the MS Places Directory Id and MS Places Section Id custom attribute fields in the sidebar on the right side of the window have been populated with the corresponding IDs from Microsoft Places.
5. Final check and export style
- Once you have mapped all the rooms to the corresponding spaces or desks on the floor plan, click the blue Publish button in the top right corner to save your progress. Wait a couple of seconds until the publishing process is complete.

- Before exporting the correlated floor plan to Microsoft Places, ensure that the building you're working on only has 1 floor. If your building has more than 1 floor, stop here, go back to the Archilogic Dashboard, and repeat the process with the other floors belonging to the same building.
Once all floors belonging to the same building have been properly correlated and linked to a building object, you can continue. - Finally, in the Settings section at the bottom, you can choose between two different export styles. Note that the selected setting will be applied to all the floor plans tied to the same building.
- No Furniture Outlines
The floor plan in Microsoft Places will only contain walls and the workstations. - Furniture Outlines
The floor plan in Microsoft Places will also contain outlines of all the other furniture assets in your Archilogic floor plan.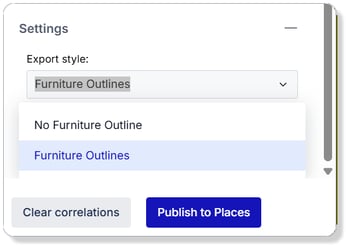
- No Furniture Outlines
6A. Upload the floor plan via API to Microsoft Places
This part is only relevant if you selected Microsoft Places API as the data source.
If you selected CSV Import as the data source jump to step 6B instead.
- If you selected Microsoft Places API as the data source, you can now click the blue Publish to Places button. You will see a small pop-up informing you whether or not the upload was successful.
That's it. The correlation process is complete.
You can now open Microsoft Places directly to check out your new floor plan!
6B. Upload the floor plan via PowerShell to Microsoft Places
This part is only relevant if you selected CSV Import as the data source.
If you selected Microsoft Places API as the data source, jump to step 6A instead.

Ensure that you have correlated all Microsoft IDs and connected all required floors to the corresponding building object before exporting the IMDF!
You canupload the IMDF-ZIP file directly to Microsoft Places via PowerShell; it doesn't require any additional editing.
The last step in the process is to upload the IMDF-compatible ZIP file containing the mapped floors to Microsoft Places:
Open the same PowerShell again.
Use the following command to upload the IMDF-compatible ZIP file to Microsoft Places:
New-Map -BuildingId XXXXXXXX-XXXX-XXXX-XXXX-XXXXXXXXXXXX -FilePath "C:\\...\\ZIPNAME.zip”
Replace the Xs with the correct BuildingId XXXXXXXX-XXXX-XXXX-XXXX-XXXXXXXXXXXX This is the same ID as above.
Make sure the path "C:\\...\\ZIPNAME.zip” points to the current location of the ZIP file you wish to upload.
After executing the command, the floor plans get uploaded to Microsoft Places. A user can now see where a certain room or a certain workstation is located on a floor plan if they wish to book it.